Roll joints are helper joints to eliminate the 'sweet wrapper' effect that linear skinning gives when twisting along the joint axis. By distributing the rotation across a number of joints you can maintain volume in the mesh, and the more joints you use the less volume you lose.
 |
| 180 degree twist distributed over one joint |
 |
| 180 degree twist distributed over four joints |
Generally it's a bad idea to drive any roll joint directly from the rotation of another (you can get away with driving forearm roll joints from the wrist so long as you choose your wrist joint rotation orders very carefully). This is especially true for the upper arm which has such a large range of movement it is guaranteed that an axis will be crossed which will give you sudden changes in Euler rotation values, making it impossible to use them to drive a twist joint.
This way of driving upper roll joints is completely independent of the rotation values of the arm and so is completely stable at all times.
Here we have the skeleton built with two roll joints for the upper arm (in green). Note that they are leaf joints, i.e they are both children of the arm joint and have no children of their own.

I see a lot of rigs with roll joints in sequence (arm-->roll_01-->roll_02-->elbow), but in my own view I think the leaf structure is far superior.
- Much easier to set up
- Allows greater flexibility with regards to driving the joint translations/rotations (which I'll cover in my next post on improving deltoids deformation using just the arm_roll_01 joint you see here).
- Can move about independently of the underlying 'main' limb joint hierarchy without having to counteract this movement further down the hierarchy.
- Less compression-generated 'jitter' at run time. In-game animations are compressed, and the longer the joint chain the more noticeable the jitter will be at the end of the chain as all the inaccuracies add up along the length. Using leaf joints keeps the primary (arm-->elbow-->wrist) joint chain length as short as possible, thereby keeping compression artifacts to a minimum.
Building the no-flip upper arm roll joint system
Note: I will assume the top spine joint is called sternum, the upper arm joint l_arm, elbow l_elbow and the roll joints l_arm_roll_01 and l_arm_roll_02.
Create a two joint chain called l_arm_roll_vecDriverJoint. Its world space translateX value should be zero (in line with the center of the character). In Y it should be at the same height of the arm joint, and in Z should be around 20cm behind. Joint orientation and rotation orders are not really important.

Create an empty group called l_arm_roll_vecDriverJoint_grp and parent constrain it with no offset to the sternum joint.
Create an ikHandle (ikRPsolver) called l_arm_roll_vecDriverJoint_ikHandle on the joint l_arm_roll_vecDriverJoint and point constrain it to the elbow.
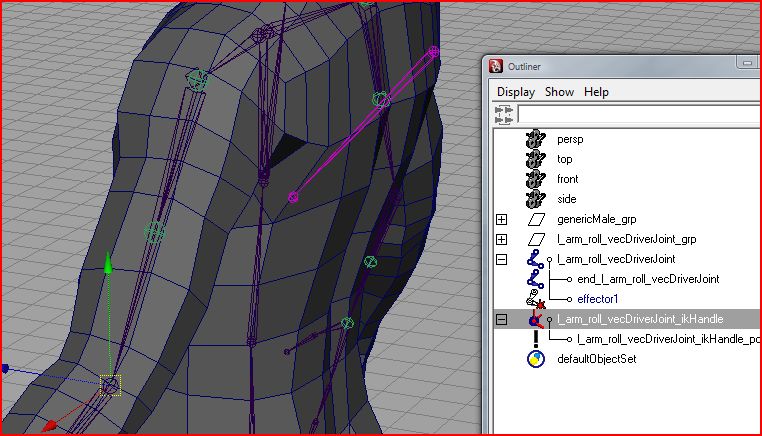
Parent l_arm_vecDriverJoint, vecDriverJoint_ikPV and l_arm_roll_vecDriverJoint_ikHandle to your group.

Create a new group called defDriver_l_arm_roll_grp. Parent constraint it with no offset to l_arm.
Duplicate both the roll joints and call them defDriver_l_arm_roll_01 and ..._02. Parent these to defDriver_l_arm_roll_grp.

Duplicate l_arm_roll_01 once more and call it defDriver_l_arm_roll_twistMod. Parent it to defDriver_l_arm_roll_01. This extra joint will allow us to distribute a small amount of the arm twist into the deltoid area, as if it remains completely static it looks quite unnatural. It will also have some further use which I'll cover in my next post.
Point constrain defDriver_l_arm_roll_02 to l_arm and l_elbow.

Create a locator defDriver_l_arm_roll_01_aimUp. Parent it to l_arm and set all rotate and translate attributes to zero. Now, in a single translate channel (Z in this example, but it depends on your joint orientation) move the locator behind the arm by around 40cm and down its length by 15cm.

Parent defDriver_l_arm_roll_01_aimUp to l_arm_vecDriverJoint.

Aim constraint defDriver_l_arm_roll_01 to l_elbow. Assuming your skeleton orientations are as mine your aim vector should be 0,1,0 and up vector 0,0,1. Set world up type to object up and world up object to defDriver_l_arm_roll_01_aimUp.
These constraint settings are specific to the joint orientation you have set. Essentially the aim vector should correspond to the down (twist) axis of your joint (so in my case +Y). The up vector should be the axis pointing backwards from the character, basically in the direction of the locator defDriver_l_arm_roll_01_aimUp which in my case is -X. You can see the joint axis in the picture below which should help you figure out the correct settings for your joints.
After creating the orient constraint, the rotation values for defDriver_l_arm_roll_01 should be 0,0,0. If you don't have zero rotation values you'll need to go back and check your aim and up vector axis are set correctly.

Create a multiplyDivide node called defDriver_arm_roll_twistMod_divide. Set operation to multiply and input2X to -0.1
Connect defDriver_l_arm_roll_01.rotateY to defDriver_arm_roll_twistMod_divide.input1X and defDriver_arm_roll_twistMod_divide.outputX to defDriver_arm_roll_twistMod.rotateY.

Create another multiplyDivide node called defDriver_arm_roll_divide. Set operation to divide and input2X to 2.0.
Connect defDriver_l_arm_roll_01.rotateY to defDriver_arm_roll_divide.input1X and defDriver_arm_roll_twistMod_divide.outputX to defDriver_l_arm_roll_02.rotateY.

Finally, point and orient constrain l_arm_roll_01 to defDriver_l_arm_roll_01 and do the same for the second roll joint so the skinned joints are being driven by the roll systems.
Here is a quick capture showing the system working. Note how I can drag the arm around without any concern of the rotation values and the roll joints are perfectly stable at all times.
Can you or would you be willing to post that mesh you are using for these tests? I think it would be a good model to work with.
ReplyDeleteHey,
ReplyDeleteThis model was very kindly put together by a friend of mine in his spare time so it's not mine to hand out I'm afraid.
Sorry to disappoint, being fairly poor at character modelling myself I know how hard it is getting decent models to work with.
Cheers,
Matt.
It's a little unclear what's going on at a point or two, you say orient constraint at one point, but your image shows you using an Aim constraint (and the way you describe the setting seems to be talking about the Aim). Could I get a little clarification, as I think i'm setting this up properly, but I'm not sure.
ReplyDeletealso, not intending to nit-pick, but another suggestion would be to be a little more clear about what the intended outcome of all of your actions is. at the area where you're talking about the aim constraint, you mention what the vectors are if someone is using your skeletal setup, but it would be helpful if you included something like "the goal is to have the bone's twisting axis aimed at the elbow joint, with the up axis pointed back" or something of that nature.
ReplyDeletegreat tutorial otherwise though, thanks :)
Hey Tyler,
ReplyDeleteThanks for the feedback I really appreciate you taking the time to comment. I've fixed the orient/aim issue; you were right I typed orient when I meant aim... I've also added a bit more description to try and get across what I'm trying to achieve with the constraint rather than simply stating values to enter that are quite specific to a particular joint orient type.
Cheers,
Matt.
Nice solution buddy, i am using it on the Knee area, for reverse rollbone setup. I is working like a charm. :-D
ReplyDeleteI use it for upper leg rolls too, only difference is I position the vecDriverJoint at the same point as the leg joint rather than sitting behind it as with the arm setup.
ReplyDeleteIt's also useful for driving an auto-follow space for arm/leg pole vector controls.
Matt.
Hey Matt! Great site :)
ReplyDeleteI've been looking around for ways to set up a no-flip-roll-setup for a while, but I have yet to find a solution for it. I've seen people linking to this tutorial claiming that this setup will get you past 180 degrees without flipping.
It might just be me that's doing something wrong, but I've gone through this tutorial a couple of times now and I get the same results every time, flipping on 180 degrees. I know that you rarely need to go past 180 degrees, but it would be awesome to have the possibility to do it :)
So I was wondering if you could confirm or disconfirm if this setup should go past 180 degrees? If it should, could you have a quick look at my file to see if you can find my problem? The link for the file is here: http://bit.ly/XdDdvY
"changes in Euler rotation values, making it impossible to use them to drive a twist joint."
ReplyDelete... I wouldn't be so sure. The upper-arm roll dilemma is relatively new to me (came across it this week), however I'm fairly certain I've found an easier method already that uses Euler values quite reliably and is stable up to any amount of rotation.
I've tried looking for all kinds of solutions these past few days and I specifically tried one that claimed to fix the whole issue. Like Jørn, I noticed flipping still in some poses. The other really concrete solutions came from people like AdamMechtley and ShadowM8, who've apparently gone out of their way to create custom constraints for solving this (although with some rotational limits, I think... don't quote me on that). If I understood correctly, their methods use quaternion math, which for the moment is beyond my understanding...
I haven't tried yours yet, although I am intrigued! I definitely love learning about the different ways of tackling a problem. You never know when it might come in handy.
PS. I might get started on a blog or channel (Youtube/Vimeo) for posting my own rigging solutions. If there's interest, I'll definitely consider the upperarm roll. Maybe you'll get to prove me wrong on the Euler bit... ;)
Hi Gerardo, could you share your approach to this?, have you posted it on youtube or vimeo?
DeleteHi there, thank you SO MUCH for this tutorial, I found upper arm twisters ridiculously hard to add without flipping. I just had a quick query - why do you point+orient constrain the roll joints in the last step as opposed to parent constrain? I'd imagine there's no difference... but maybe there is?
ReplyDeleteThis comment has been removed by the author.
ReplyDeleteThis comment has been removed by the author.
Deletenice
ReplyDeleteWow, these boxes' plans are so much astounding. I fair adore that printed one. It looks so much cooler. I was considering to urge one from this. I adore collecting bundles. Like I have a few quality joint container. They are truly exceptionally great. Their quality is astounding.
ReplyDeleteHi Matt! When you're doing the multiply-divide nodes magic, do you use Y because it's the twist axis for your joints? Does it mean if my joints are using X, I should be working with X axis instead? It's unclear in the description.
ReplyDelete