The tool I'm going to cover here automatically skins hair planes based on an underling mesh, and ensures that each vertex in a single hair segment has unified skin weight values to preserve (as much as possible) the shape and volume of each piece as it deforms.
This is definitely aimed more at the games developers that don't have the luxury of using the various hair/fur shaders, but it should be of general interest for anyone looking to write skinCluster related scripts.

I've set up a really quick scene that broadly represents how in-game hair can be constructed. The flat plane represents the skinned body of the character, the green mesh the hair planes.
You can download a .rar archive of the file here.

I've placed a joint chain along the centre of the plane and smooth skinned the mesh to it. Painting weights on a single mesh like this takes no time at all; a default weight and spending a minute smoothing values gives a quick smooth deformation. Really it couldn't be quicker.

The problem is how to paint our weights on the hair elements. Attempting to manually paint weights on these kinds of meshes is extremely time consuming and often near impossible where there are lots of closely overlapping pieces (this example mesh isn't at all representative of the complexity that would be usual in our in game models).Then there is also the problem of operations such as flooding smooth not crossing mesh boundaries even if the planes are combined into a single poly. So in short, for a number of reasons, painting weights on this kind of thing is a total arse.
One solution would be to simply copy skin weights from the underlying plane to the hair mesh. Lets do that and see what we get...
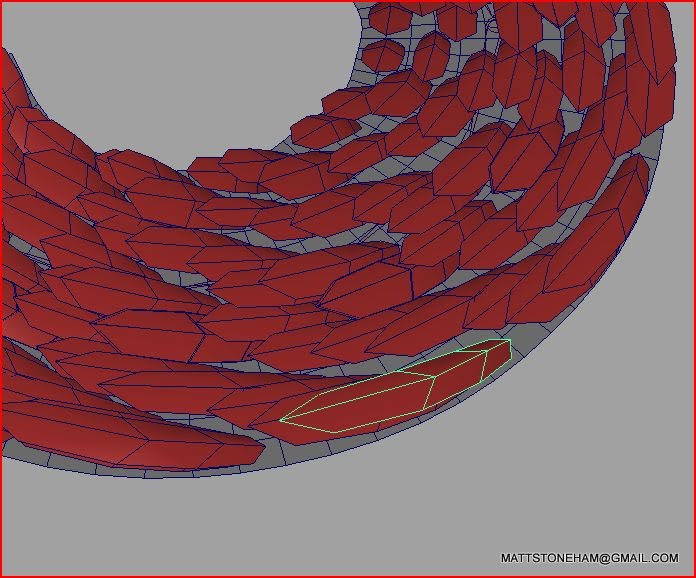
Here is another view as the plane is curled into a cylinder.

So, here are the same two examples with the hair planes auto skinned.
Here you can see that the hair segments still perfectly follow the surface underneath, i.e appear attached to it, but are much less stretched and distorted. On the bottom picture you can see the faint red of the previous hair skinning to compare the two directly.
If you haven't already you can download this file from the link earlier in the post and look at the differences yourself.

Lets look at the two different skin weight values generated for a single hair plane in the component editor.

The bottom group is the hair mesh segment with a simple copy weights from the underlying poly plane, you can see the varying weight values that result in the rubbery deformation.
The top group are skin weights for a hair segment automatically generated by the hair skinning tool, here the weight values are unified for each vertex in the hair segment. This means that distortion of the segment is kept to the absolute minimum. (You will still get some stretching; the only way to avoid that would be to skin to a single influence only. Clearly it's not practical to do this in a game engine setting as you would need a joint per segment to do it.)
So far we've established that we can get a better result with more appropriate skin weights. Now that's not entirely surprising, the real problem we need to solve is how to set those weights on this type of mesh that doesn't require loads, potentially hours even, of really fiddly weights painting.
Let's have a look at the tool to set these weights for us automatically.
Below is a link to the script so you can load it into your text editor and I'll go through individual parts of it underneath. You will also need this script for copying weight values between verts as it is called within the NT_skinHair procedure.
Download >> NT_skinHair.mel
The first bit is really straightforward; storing the source mesh (the underlying 'skin'), the target mesh (our hair planes) which should be a single combined mesh, and the skinClusters for each.
global proc NT_skinHair()
{
// Source script that copies weights from one vertex to another
string $toolPath = NT_getScriptRoot();
eval ("source \""+$toolPath+"/Rigging/NT_copyWeightsVertexToVertex.mel\";");
// Store selection. Source and target meshes.
string $sel[] = `ls -sl`;
// Store source and target mesh skinClusters
string $sourceSkinCluster = `findRelatedSkinCluster $sel[0]`;
string $targetSkinCluster = `findRelatedSkinCluster $sel[1]`;
Next, copy skin weights from the source mesh to the hair mesh. This means that the closest vertex on the hair segment to the source mesh has the weight values values we want to apply to all verts on that segment.
Also, grab a complete vertex list for the hair mesh. Using the -fl flag on the ls command ensures you get a return per vertex, rather than a single return containing a range.
select -r $sel[0] ;
sel[1] ;
copySkinWeights -noMirror -surfaceAssociation closestPoint -influenceAssociation oneToOne -influenceAssociation closestJoint;
// store source mesh in $sourceMesh - it's easier to remember than $sel[0]
string $sourceMesh = $sel[0];
// easiest way of getting a vertex list for a mesh - Maya allows you to put in a huge number and it'll just select what is there without erroring
select (($sel[1])+".vtx[0:999999999]");
// vertex list into an array, use the -flatten flag!
string $vertList[] = `ls -sl -fl`;
The next loop is all about finding a way of being able to identify each hair mesh segment individually. I want to go from an array containing every vertex on the hair mesh to an array that contains just a single vertex for each hair segment. This will enable me to identify, and therefore skin weight, each mesh segment individually.
for ($vert in $vertList) {
$progressCounter ++;
progressWindow -e -progress $progressCounter;
// use ...returnSegmentVerts to return vertex list for the hair segment based on $vert
string $currentSel[] = NT_skinHair_returnSegmentVerts($vert);
// place $vert into an array as stringArrayRemoveExact only accepts arrays as arguments
string $initialVertSel[] = {$vert};
// remove $vert (in the array form $initialVertSel) from array of all hair segment verts
$currentSel = stringArrayRemoveExact($initialVertSel, $currentSel);
// remove verts from array $vertList, leaving just the one vertex for this segment in the array
$vertList = stringArrayRemoveExact($currentSel, $vertList);
// UI stuff...
$progressMax = `size $vertList`;
progressWindow -e -status ("Checking "+($progressMax)+" verts") -max $progressMax;
}
For $vert (a given vertex anywhere on the hair mesh), a complete list of verts for that segment is returned by the procedure NT_skinHair_returnSegmentVerts. Then, all verts except one ($vert) are then removed from the array $vertList. So, each loop I'm essentially stripping out all but one of the verts for a given hair segment from the array $vertList. Eventually this leaves the array containing just one vertex per segment. Editing verts out of the array $vertList as the loop is operating on it means that the tool is much quicker as it's not checking verts multiple times - as each loop completes the size of the array the loop is working on reduces in size.
So, now we have an array that has one vertex per hair segment. This allows us to do our skin weighting for each one.
We just need to figure out what weight values we should apply to all the verts in the hair segment. Because of the weight copy earlier I know that the vertex closest to the source mesh (our plane in this example) has the weight values I want to apply to the whole segment.
The way we go about finding which is the closest point is using two locators sourcePosLoc and meshPosLoc, a closestPointOnMesh node and a distance node.
spaceLocator -n "sourcePosLoc";
string $cPoM_node = `createNode closestPointOnMesh`;
connectAttr -f (($sourceMesh)+".outMesh") (($cPoM_node)+".inMesh");
connectAttr -f "sourcePosLoc.translate" (($cPoM_node)+".inPosition");
spaceLocator -n "meshPosLoc" ;
connectAttr (($cPoM_node)+".position") "meshPosLoc.translate" ;
string $dist_node = `shadingNode -asUtility distanceBetween`;
connectAttr "sourcePosLoc.translate" (($dist_node)+".point1");
connectAttr "meshPosLoc.translate" (($dist_node)+".point2");
The closestPointOnMesh node takes two inputs; sourcePosLoc.translate and a source mesh. In the example here this is the plane the hair sits on. The output is to the locator meshPosLoc.translate
As the locator sourcePosLoc moves around the closestPointOnMesh figures out the closest point on the mesh to that locator and outputs that position to the locator meshPosLoc.
So, for each vertex on a hair segment we move the input locator sourcePosLoc to it and check the distance between it and output locator meshPosLoc. The closest vertex on the hair segment to the source mesh is the one that returns the shortest distance. Once that vertex is identified, the weights are copied from this to the other verts on the hair segment using the procedure NT_copyWeightsVertexToVertex.
for ($vert in $vertList) { // essentially this is a loop per hair segment, using the vertex as an identifier
$progressCounter ++;
progressWindow -e -progress $progressCounter;
progressWindow -e -status ("Weighting mesh element "+($progressCounter)+" of "+($progressMax));
// grab all verts for this hair segment
string $segVerts[] = NT_skinHair_returnSegmentVerts($vert);
// as we'll be comparing distances, set the initial compare ($lastDistance) value to something really high
float $lastDistance = 999999999;
// string for storing the closest hair segment vertex to the source mesh
string $closestVertToSourceMesh = "";
for ($segVert in $segVerts) { // for each vertex in the hair segment
// set locator sourcePosLoc to world space vertex position
vector $vert_p = `xform -q -ws -t $segVert`;
setAttr "sourcePosLoc.translate" ($vert_p.x) ($vert_p.y) ($vert_p.z);
// check distance from this point to the closest point on the source mesh, represented by
// locator meshPosLoc
float $thisDistance = `getAttr (($dist_node)+".distance")`;
// if distance is less than the last one, set $closestVertToSourceMesh to current vert ($segVert)
if ($thisDistance < $lastDistance) {
$lastDistance = $thisDistance;
$closestVertToSourceMesh = $segVert;
}
}
// found vert closest to the source mesh, stored in $closestVertToSourceMesh
// now copy skin weights from this to other verts in the mesh element
string $removeFromArray[] = {$closestVertToSourceMesh};
$segVerts = stringArrayRemoveExact($removeFromArray, $segVerts);
select -r $segVerts;
NT_copyWeightsVertexToVertex($closestVertToSourceMesh);
}
This looks a fabulous tool! very helpful. I've posted on my website (hairfur.com).
ReplyDeleteHi Matt, these scripts look great. A few errors though:
ReplyDeleteIn NT_copyWeightsVertexToVertex.mel:
Error: Line 65.67: "$influenceArrayskinValues" is an undeclared variable.
I assume this should be $influenceArray $skinValues etc...
And in NT_skinHair.mel:
Can't find procedure NT_getScriptRoot(). Which is fine, I just hard-coded the source command.
Anyway after all of that, it didn't really work anyway. I get a whole bunch of these errors:
// Warning: file: NT_copyWeightsVertexToVertex.mel line 65: Some weights could not be set to the specified value. The weight total would have exceeded 1.0. //
and so the skinning looks terrible. Not the expected result.
If you could think of what might be going wrong, it'd be great to hear from you.
Cheers!
Yes, Mr. Matt's mel code has some errors, which I have corrected. Here is the code address: https://pastebin.ubuntu.com/p/rW2r6HKrKF/ .
DeleteUnfortunately, this website requires login to access, but it is free. Using it can effectively communicate code content. Please note that this code is only retained for one year as it is temporarily saved online. If you have any other questions, please reply to me promptly. Additionally, I prefer to use pyhton to solve problems in Maya.
Hii..Great share....
ReplyDeleteReally Very helpful..
GameYan Studio
A FAUX FUR THROW, FUR CUSHIONS, RUSTIC OAK TABLES AND A GREAT SELECTION OF RUGS. WELCOME TO OUR ONLINE SHOP.
ReplyDeleteLarge fur blankets
hi, man the scripy NT_skinHair.mel can;t dowlodad now ?
ReplyDeletePerhaps you are looking for a handsome oak beam coffee table to lend gravitas to your furnishings? Or maybe you’re looking for a fetching oak side table on which to place your beloved novelty mug... or a stylish oak lamp table to help illuminate your favourite book? Fur throw
ReplyDelete