Tuesday, 30 November 2010

Customising a Maya menu

In this post I'm going to kill two birds with one stone and cover two things;

1) A script I use pretty much every day for point, orient or parent snapping one object (the source) to another (the target). The point snap also works with a vertex selection or multiple nodes as a source.

2) How to add these to the standard Maya Constrain window


Monday, 29 November 2010

Using upper arm roll_01 to help deltoid deformation

In this post I'm going to expand the function of the upper arm roll joint system I posted about here.
The aim is to improve the deltoid deformation as the arm is raised from this

...to this, simply by driving the translateX and rotateZ channels of l_arm_roll_01 via the defDriver_l_arm_roll_01_twistMod joint that makes part of the upper arm roll system.


Sunday, 28 November 2010

No-flip upper arm roll joints

For those that know what roll joints are, skip ahead to the next bit.
Roll joints are helper joints to eliminate the 'sweet wrapper' effect that linear skinning gives when twisting along the joint axis. By distributing the rotation across a number of joints you can maintain volume in the mesh, and the more joints you use the less volume you lose.


180 degree twist distributed over one joint
180 degree twist distributed over four joints

In this post I'll be covering how I set up roll joints for the upper arm to give a nice distribution of down-axis twist deformation regardless of the rotation values of the arm joint.
Generally it's a bad idea to drive any roll joint directly from the rotation of another (you can get away with driving forearm roll joints from the wrist so long as you choose your wrist joint rotation orders very carefully). This is especially true for the upper arm which has such a large range of movement it is guaranteed that an axis will be crossed which will give you sudden changes in Euler rotation values, making it impossible to use them to drive a twist joint.


Thursday, 25 November 2010

Rotation orders

Rotation orders are perhaps one of the most neglected areas of rigging and yet they have a major impact on the stability of the rig and usability for the animators. Setting the correct orders can save hours of work trying understand curves that make no sense and struggling to clean up wierd rotation pops in a single animation. Multiply that over all animations for a character, all characters in a project and suddenly the importance of getting this right becomes self evident.

The rotation order of a node is basically the order that rotation axis are evaluated. By default Maya creates nodes with an order of xyz which is generally not the optimal setting.

Wednesday, 24 November 2010

Skeleton layout part 2

Since my intital post on skeleton layout I've figured out how to use Google Documents... so here is a basic biped skeleton:
Biped skeleton

Things of note:

  • There are two stored poses on the skeleton for use with the Pose Manager tool - the model pose and T pose.
  • It has two roll joints in the upper arm, two in the forearm and two in the upper leg. You can get away with a single roll joint in each area if you have to, but two is what I'd consider the minimum for nice twist deformation. If you want to implement stretchy limbs for a game engine (so no joint scaling, just rotate/translate) you need more. Anyway, I'll come to all of that over the coming posts.
  • The root joint at world orgin is a requirement of the runtime animation system, so unless you're producing game assets you won't need it.
  • COG (center of gravity) position overlaps with spine_01. The reasons for this will become clear when I post on spine control set up.
  • The top of the legs have the same tY and tZ position as the COG joint, creating a T-bar configuration in the hips area. I'm a big fan of this kind of layout as it means you can rotate the COG of the character without legs raising off the floor. It's also the preferred layout if your skeleton is to be used for motion capture.
  • Fingers are not fully articulated

Cleaning multiple bind poses

A common problem that crops up in our pipeline is multiple bind poses on a character. These are introduced as meshes are updated and replaced and also as a by-product of creating modified bind poses for volume preservation (see previous post).
This used to be a real pain in the early days before I wrote the Pose Manager tool as Maya is really poor at managing multiple bind poses. However, parts of our character export pipeline and some other custom tools still require a single bind pose for a character and it is for this reason that it's important that a skeleton only has a single bind pose (dagPose) associated with it.

This is a simple script I put together that rebuilds a single dagPose for the selected skeletal hierarchy. Obviously you need to run this when the skeleton is in your bind pose which is where the Pose Manager tool comes in useful once more. Don't forget that if you have a modified bind pose for volume preservation you need to set your skeleton to that rather than the model pose.

NT_rebuildDagPose.mel

To run, select the top joint of your skeletal hierarchy and run NT_rebuildDagPose.

Helping volume preservation through a modified bind pose

One of the major problems with linear skinning is volume loss on the model. Generally this is most noticeable at the elbows, knees and buttocks and is also the cause of the 'sweet wrapper' effect if a joint is rotated along its down axis.

There are lots of solutions for helping maintain volume. If you're familiar with Maya 2011 you'll probably have noticed the blended dual quaternion (DQ) skinning for example which is a great solution. Unfortunately if you're producing assets for a game engine you're generally stuck with linear skinning. I have come across game engines that support DQ skinning but only as a complete replacement to linear skinning and in my experience it's only really worthwhile if you can use both methods together. It is also computationally more expensive which is a factor in game development.

Managing multiple skeleton poses (model pose, T pose etc.)

Usually the skeleton will be built for a mesh in a model pose and this is also the position that the mesh will be skinned in. For constructing control rigs however, we want the skeleton in a T pose.

Also, character models are frequently updated after the rig is created and functionality can change which require modifications or additions to the skeletal hierarchy. All these modifications need to happen with the skeleton in the original bind pose, so the ability to store and apply multiple poses for both creation and ongoing maintenance of character rigs is essential.

Tuesday, 23 November 2010

Skeleton layout

Generally I have some kind of joint budget I have to work within when starting out with a new character. For a standard NPC (none playable character) where we are aiming for ten or so on screen at once the aim is to come in under 50. There's generally a bit of wiggle room there; some come in comfortably under that and others are a touch over. Joint count isn't the only factor in how efficient a character is; the number of animated channels per joint has an impact on animation data footprint, number of skinWeight influences per vertex on skinning processing... I'll come onto these things in later posts but for now the point I'm making is that this is the point where you need to identify how to best use your joint budget; do I really need a fully articulated hand or will it be more noticeable in game if I use a more basic joint layout there and use the joints saved for extra roll joints in the arms and legs? It can be helpful at this stage to print out a front/side view of the model and draw your skeletal hierarchy over the top.

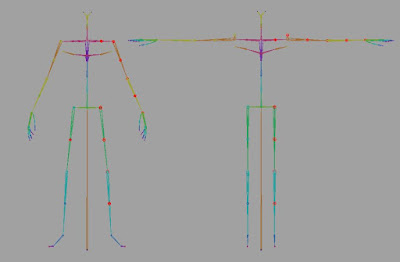
Initial layout is done in a relaxed model pose as it's not practical for character artists to model in the T pose (also known as the Jesus pose) that you use as the starting point for a control rig. This tends to be with arms at around 45 degrees, elbows slightly bent, legs and feet pointing out slightly. Being able to manage and switch between model and T poses will really help your work flow and will be the subject of my next post where I'll cover the pose manager tool I use for this.
The same skeleton in model pose (initial layout) and T pose (ready for rig construction)


Monday, 22 November 2010

Basic scene and rig structure

It's impossible to overstate the importance of an organised approach to rig building. Even if the rig is a simple one it's a good idea to maintain good working practices at all times. As rigs become more complex and require ongoing work or bug fixing days, weeks, or even months after it was initially built a good scene and rig structure is essential if you are to stand any chance of making sense of it all.


Rig structure - separate out your systems.

Character rigs consist of three main sections.
  • Control/driver rig
  • Deformation rig
  • Exportable, skinned skeleton (unbroken hierarchy)
The exportable skeleton is an unbroken skeletal hierarchy. Meshes are skinned to this skeleton, and this is what is exported to game. It is driven by the control/driver rig and deformation rig by point and orientation constraints, but other than that it remains completely separate to all deform or control systems. This separation of systems is a key principle in rig building.

Tuesday, 16 November 2010

Quick mention for a talented character artist I work with

...his name is JB and his blog is http://jb1er.blogspot.com/

Take a look, he's a good guy and a very talented character artist.

Matt.

Couple of quick links

This site really helped me in the early days of rigging http://rigging101.com/freestuff.htm

It's well worth doing the tutorials on there to familiarise yourself with some of the more basic concepts, there are also some free rigs that are worth a look. I've not been there for a while, but I did just notice the 'Great Dane' rig from an Autodesk Masterclass has been added recently which has a good quadruped leg set up (I've used this a number of times now).

I'd also recommend visiting http://www.tech-artists.org/ They are a friendly bunch, always willing to help people out. 

Introduction

Hey,

I work in the games industry as a Senior Technical Artist for Ninja Theory http://ninjatheory.com/
I started out in March 2001 as a junior animator at Just Add Monsters (what is now Ninja Theory) before moving to Sony Cambridge in June 2004 and moving from animation to tech-art. While at Sony I became a senior artist and did a stint at Guerrilla Games in Amsterdam before coming back as a Ninja in September 2008.

My primary task is character set up - control rigs, deformation, associated tool sets (MEL) but I also look after animation pipelines, set up physics through NaturalMotion Connect, and do a few bits in Unreal Engine too.

I'll mostly be posting about character rigging and scripting, it can be a bit hit and miss looking for rigging info on the net and so this is an effort to try and rectify that in a small way.

It's really important to note that everything on here will, initially at least, be geared towards game characters. This means that the only data that is exported are joints, skin & skin weights and joint rotations/translations. Obviously this has a major impact on setting up characters as everything ultimately has to come down to joints. It's no good setting up some nice deformation using a lattice or a non linear deformer because these things just aren't supported at runtime. It's perfectly possible to use these things within the deformation rig but ultimately everything needs to drive a set of joint translations and rotations. Not even joint scaling is supported!

The plan is to start with a few essentials that anyone already familiar with character set up will know, but I think it's important to lay a good foundation down before tackling more complex problems. Once that is done I'll post up bits and pieces as they occur.